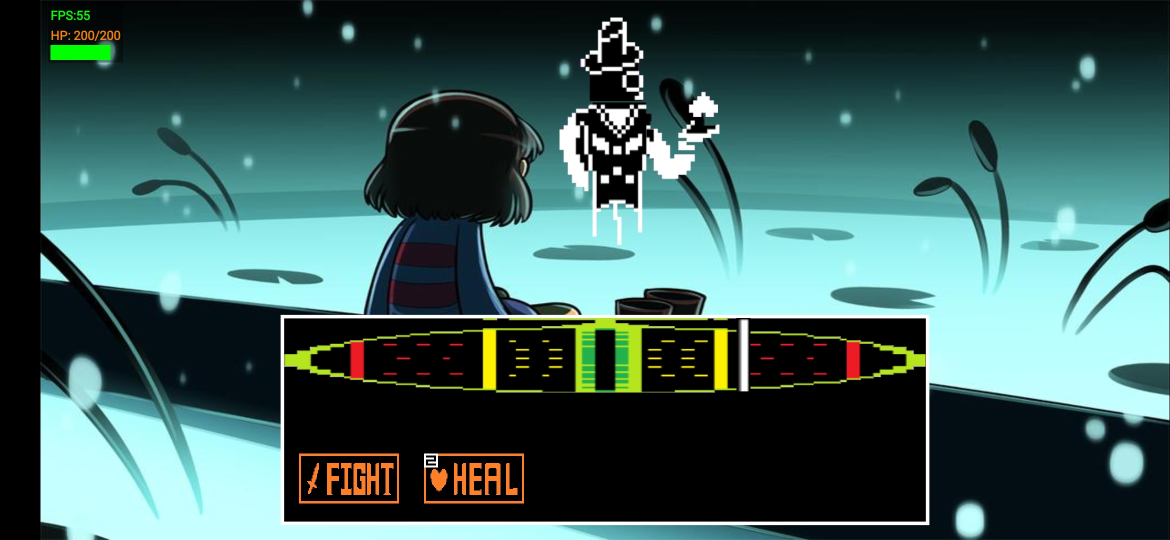
Making Hat Guy!
Now We will make the above boss step by step, if you want to see a video tutorial of custom skins you can watch it Here
If you want to download the boss you can find it here Hat guy
Step 1 - Creating a new boss
First we need a new boss with some simple data
- Enter your name as creator
- Give the boss a name
- Leave everything else as is
Step 2 - Adding the skin
Next we will import the sprite
- Set skin to URL
- Set url to Url
- Press the download button
- Go back and test your boss
You will now see the sprite sheet displayed
Step 3 - Adding the Head
Now we can't have the sprite looking like that, we need to do a few things to make it look good
- Next to the skin where we put the url, press advanced
Here we can add parts to the sprite
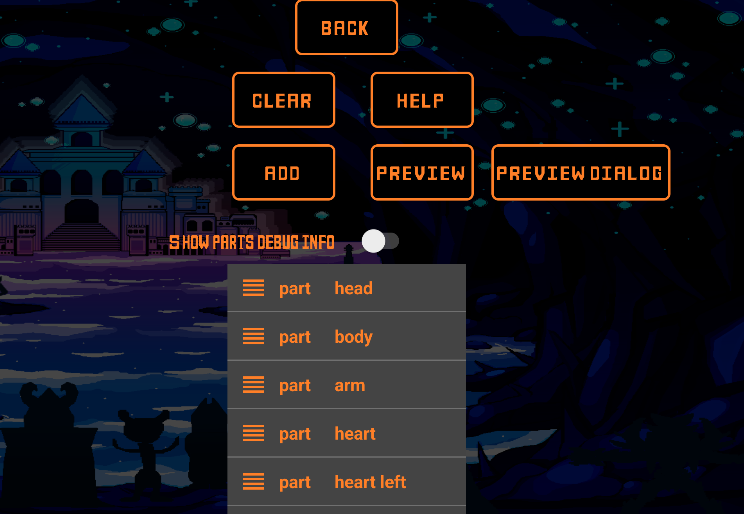
This is what we are aiming for, as you can see we will need parts for the different body parts.
Lets start with the head
- Press ADD to create a new skin part
- Name it "Head"
- Set Start X to 91
- Set Start Y to 0
- Set Width to 68
- Set Height to 82
- Set position X to 10
- Set position Y to -115
- Enable moving
- Set moving direction to 0
- Set moving seconds to 2
- Set moving distance to 2
- Now Save and go back
- Press preview to see what it looks like
We have a floating head! Good job. Now lets explain in detail what we did.
First lets start with the basic of defining a part like the head.
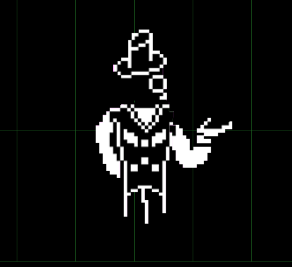
This is what the sprite looks like
To draw only the head, we need to know the coordinates in pixels from this sprite
The first part is the body and then the head
To get the starting X value, we need to find how many pixels are from left to right until the head starts, you can either zoom in and count pixel by pixel or use a app for this that shows you the coordinates
Doing that we can see that the head starts on 91 pixel from the left, and the head is already at the top so the y value is 0
That gives Starting X = 91 and Starting Y=0
Next we need to know how wide and high the head is, using the same counting method as before we can see that the head is 68 pixels wide and 82 pixels high.

Setting these values will already be enough to draw this part in the center of the boss position
But since it is the head and the head should not be in the middle we need to sett a "offset" or position

But head should not be in the middle, it is a bit to the left and up, so we need to set the position X to -10 and position Y to -115
Now we have the head drawn at the position that we want it to be
To find these values you will normally need to experiment a bit, setting a positive x value moves it to the right, setting negative moves it left. In the same way negative y moves it up and positive moves it down
You can try adjusting the values and see what happens

But we want the head to move, so we enable moving and set the direction to 0, this means that the head will move up and down
Next we set the moving seconds to 2, this means that the head will move up and down over 2 seconds
And lastly we set the moving distance to 2, this means that the head will move 2 pixels up and down
Step 4 - Adding the body
Now we need to repeat the process by adding the body
The steps are the same, add a new part, find and set Starting X, starting Y, width and height
- Press ADD to create a new skin part
- Name it "Body"
- Set Start X to 0
- Set Start Y to 0
- Set Width to 90
- Set Height to 145
- Set position X to 0
- Set position Y to 0
- Enable moving
- Set moving direction to 0
- Set moving seconds to 3
- Set moving distance to 1
- Now Save and go back
- Press preview to see what it looks like
Now we are getting closer and we should now have a head with a body!
Step 5 - Adding the arm
The final part of the body is the arm and the process is the same
- Press ADD to create a new skin part
- Name it "Arm"
- Set Start X to 91
- Set Start Y to 84
- Set Width to 74
- Set Height to 62
- Set position X to 77
- Set position Y to -25
- Enable moving
- Set moving direction to 0
- Set moving seconds to 3
- Set moving distance to 1
- Now Save and go back
- Press preview to see what it looks like
You have now completed the hat guy sprite! Congratulations!
If everything worked you should now have the hat guy with a head, body and arm
If something looks wrong or out of place, go back to each part and make sure that you used the correct values
Step 6 - Adding a floating heart
Now we want to move on into a bit of animation!
We want the Hat Guy to have a heart floating in his hand and have it animated as well
This is what the sprite we are using looks like and you see the hearts in the bottom, those are what we are going to use
Most of the process is the same as before
- Press ADD to create a new skin part
- Name it "Heart"
- Set Start X to 0
- Set Start Y to 150
- Set Width to 29
- Set Height to 25
- Set position X to 95
- Set position Y to -70
- Enable moving
- Set moving direction to 0
- Set moving seconds to 1.3
- Set moving distance to 6.1
- Now Save and go back
- Press preview to see what it looks like
Now you should have a simple moving heart in his hand
Next lets animate it using the animation set
In the sprite image we have two hearts, one pointing up and one down, they are the same size and on the same row with 1 pixel between them. This is a animation set

To use this go back to the heart part, go down and enable animation set
- Enable animation set
- Set animation parts to 2
- Set animation parts row to 2
- Set animation delay to 41
- Set animation loop to on
- Now save and go back
- Press preview to see what it looks like

This it what the final result should look like
If you want to know more about the values that you put to make it happen, read more about animations here
Step 7 - Visibility
Now we want to do some advanced stuff to make it more dynamic
We are going to add another moving heart that is only visible when the boss is attacking
So we need another hear with mostly the same settings as we used before
- Go back into the heart that we just created
- Change the name to "Heart left"
- Click on Save Copy
- DO NOT click the save button, just go back
- In the list now you will see a new part called "Heart left"
- Click on it and you should see that it has the same values as the other one
- Change position X to -95
- Change position Y to -70
- Change moving direction to 90 (moving right)
- Change moving distance to 31
- You can now save, go back and preview
You should now have another heart moving from left to right at the left of hat guy
But we wanted it to show only during the attack, so lets fix that

Go back to the heart left part and go down to visibility settings
- Disable show Idle
- Enable show attacking
- Disable show attacked
- Enable show from start
- You can now save, go back and preview
Now you should not see the left heart from the start, but if you attack the boss you will see the heart appear during the boss's turn
For the final visibility part we will make a part appear and disappear based on the dialogs that the boss use
To do this we need another heart
- Go back into the heart that we just created
- Change the name to "Heart left2"
- Click on Save Copy
- DO NOT click the save button, just go back
- In the list now you will see a new part called "Heart left2"
- Click on it and you should see that it has the same values as the other one
- Change position X to -120
- Change position Y to -70
- Change moving direction to 0 (moving down)
- Set Show from start to disabled
- Set Show command to "SHOW"
- Set Hide command to "HIDE"
- You can now save, go back and preview
Hopefully nothing will change and you will not see the heart that we just created
What we need is to trigger the commands that we just wrote into the heart part
This is done in the dialogs by using the commands like {SHOW} or {HIDE}
So when you write your dialogs you can include the commands surrounded by {} to trigger the show and hide command
For now we can use the preview dialog button
- Press the preview dialog button
- Press the "Dialog text"
- Input these values Dialog ]2 {SHOW} Heart showing ]2 okay ]2 {HIDE} heart hiding]2
- Press okay and attack the boss to see the result
What we did here is to use the dialog commands that you can read more about here
Now we are done with the sprite parts, go back to the basic boss settings and lets set the menu and music
Step 8 - Set background and music
- Set the background to URL
- set the url to Url
- Set the music to URL
- set the url to: Url
- Press download
- Test the boss
It should look like this